
Before you can put your solo seed spreader to work, you will need to attach the crank handle and carry straps. Begin by removing the hopper lid where the crank handle and strap are located inside
ASSEMBLY
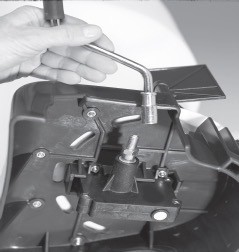
MOUNTING THE CRANK HANDLE
Place the spreader on its left side (as viewed from the operators’ position) the threaded crankshaft and affix the crank handle in a clockwise motion, tighten the jam nut against the crank handle.
SHOULDER STRAP
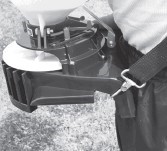
Stand the spreader upright at about waist level on a table, bench, or stand. Adjust the slider buckle to extend the p to its longest length. Attach the strap hook to the top right eye on the hopper (as viewed from
the operator’s position). With the back of the spreader facing your chest, slip the strap over your right shoulder and across your back. Set the strap hook under the spreader housing. With the spreader fitted, crank the handle, and determine if the spreader is set at a comfortable height. Remove the spreader, adjust the strap, and try again until you are comfortable with the fit and function.
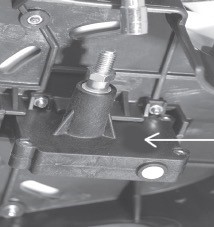
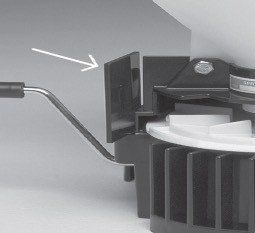
LUBRICATION POINT
With the spreader on its right side (crank handle side up), observe the small oil hole in the gear case.
ADJUSTING THE SPREADER
Your spreader is adjustable for both volume and direction. Five factors determine the volume and direction.
They are:
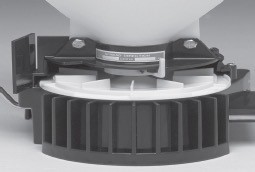
1. Flow Limiter Stop – This brass stop nut allows you to limit the hopper opening for consistent delivery of material to the impeller.
2. Flow Rate Lever – Look down into the hopper to observe how the drop chute opening varies as you adjust the flow rate lever.
3. Directional Lever – This control adjusts the point where the material is to be deposited on the impeller and, consequently, the width of spread. The lever can be set for the center, left, or right spreading.
4. Deflector Shield – Increase or decrease the width of spread.
5. Cranking Speed – Cranking faster or slower affects volume and coverage.
FILLING THE HOPPER
1. Move the flow rate lever to zero position.
2. Set spreader on a flat surface.
3. Remove the hopper lid.
4. Fill hopper. For the initial use, it is wise to partly fill the hopper and practice spreading and adjust as needed.
5. Replace hopper lid – the lid prevents spillage and helps keep dust and other material away from the operator.
6. When spreading chemicals, be sure to wear protective clothing, respirator, and eye protection.
7. Do not load the hopper while carrying the spreader.
OPERATING INSTRUCTIONS
1. Set the spreader on a surface to fit the carry strap safely and conveniently, as outlined in the assembly section.
2. Set the deflector to the desired position.
3. Adjust the spreading direction lever to the desired position. Directional changes can also be made simply by walking in the desired direction.
4. While turning the crank handle with your right hand, move the flow rate lever with the left hand to adjust the flow rate. The flow limiter stop will control the flow rate.
Caution: Keep hands away from rotating impeller.
5. After use, turn the flow rate lever to the closed (zero) position. Crank the handle several times to make sure no material residue is attached to the impeller.
Clean the whole unit thoroughly using soap and water.
OTHER OPERATIONS SUGGESTIONS
1. Walking speed: 2.5 – 3.0 feet per second (80-90cm/sec.)
2. Crankhandle speed: 55-65rpm.
3. Each complete revolution of the crank handle causes the impeller to rotate 7 1/2turns.
4. Experiment to find the best setting.
5. In windy conditions, plan your work, so the wind is behind you if possible.
STORAGE
1. Empty the hopper of contents. Store or dispose of contents properly and in accordance with the chemical manufacturer’s instructions.
2. Check all bolts, nuts, and screws for proper tightness.
3. Clean the unit with soap and water.
4. Dry.
5. Store in a safe place.
Would you rather download the PDF? Click here.